How To Make Friendship Bracelets (basic diagonal stripe)
by Sandy KB
(London UK)
This makes a simple, short bracelet. The basic pattern can be used to
make lots of other variations once you’ve become more confident with how
to make one.
Don’t worry if you don’t get it right the first time - it took me quite a few tries! - but once you get the hang of it, it becomes a lot of fun!
Friendship bracelets make fantastic gifts.
These instructions are:
- simple
- easy to follow
- and you don't need anything much apart from embroidery threads!
Friendship Bracelet Materials
- Embroidery threads (various colors)
- Scissors
- Piece of cardboard or book (to clip bracelet onto while making)
- Clip (to hold threads in place)
- Ruler or tape-measure
Basic Diagonal Stripe Friendship Bracelet
Instructions
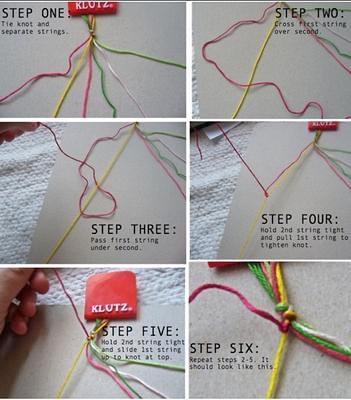
STEP ONE: Can use four, six or eight pieces of thread, each 25 inches
long, preferably in different colours to make it easier. The more
threads used, the wider the bracelet will be. Tie all threads together
with a knot about 2-3 inches from top and clip to a piece of cardboard
or a book.
STEP TWO: Take the first thread (dark pink) and cross it over the second thread (yellow) so it looks like the number ‘4’.
STEP THREE: Pass the first thread (dark pink) under second thread (yellow) keeping the second thread (yellow) straight. See photo stage three.
STEP FOUR: Keeping the second thread (yellow) taut, pull the first thread (dark pink) so the knot tightens. See photo stage four.
STEP FIVE: Keep the second thread (yellow) taut and slide the pink knot up to the top. See photo stage five.
STEP SIX: Repeat steps two-five to make a second knot with the same threads.
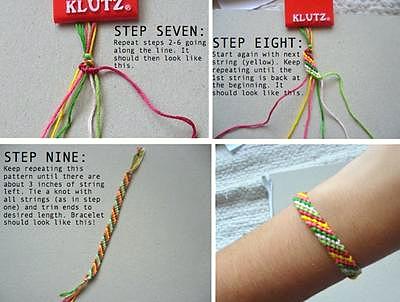
STEP SEVEN: Repeat steps two-five with the first thread (dark pink) and third thread (bright pink), and continue along the line until the first string (dark pink) is now the last string and you have a line of dark pink knots. See photo stage seven. This is always hard the first time so don’t worry if your friendship bracelet doesn’t look exactly the same as it does in the photo. The next line will be easier.
STEP EIGHT: Start again using the second thread (yellow) as the main knotting thread (instead of the dark pink) and go along the line as in steps two-seven. Continue until every string has been used and the first thread (dark pink) is back at the beginning of the line. As in photo stage eight.
STEP NINE: Carry on until there is only about three inches of each thread left. Tie a knot with all the threads (as in step one) and trim the ends. Your bracelet is finished!
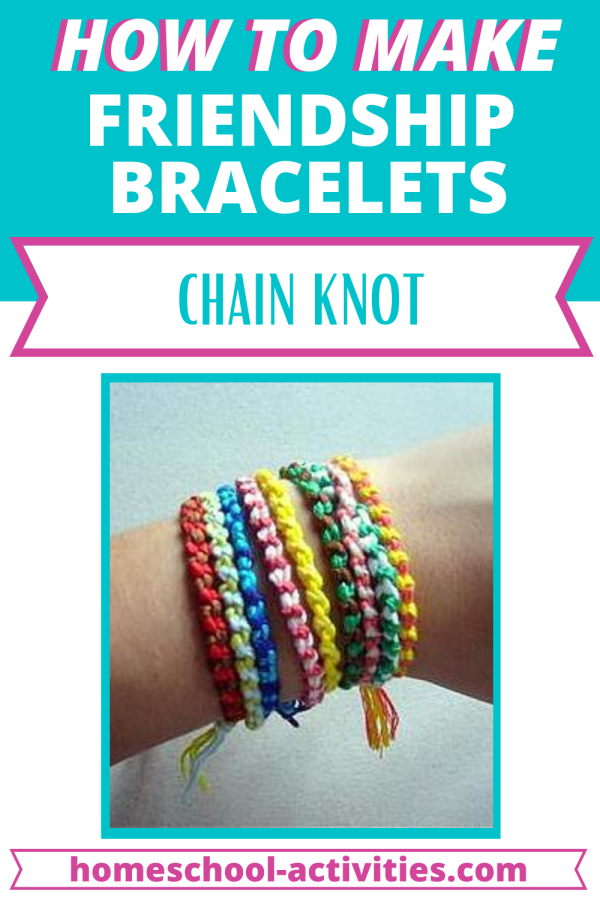
How To Make A Chain Knot Bracelet
If you'd like to see how to make a simple chain knot friendship bracelet, have a look on my other how to make friendship bracelets page.
Tips For How To Make A Friendship Bracelet
For the Basic Diagonal Stripe friendship bracelet, there are a few things to watch out for. Here are some ways to avoid and fix them. See reference to the photos for each number.

1. If the knot is the wrong colour thread (for example, the light pink
knot amid the dark pink in the photo) that means you’ve been pulling the
wrong thread when tying the knot. If you’re on the dark pink
row and there’s a light pink knot instead of a dark pink one, that means
you’ve been holding the dark pink taut instead of the light pink. Make
sure to always keep the light pink taut and loop/tie the knots with the
string you’re making the row with. This way you can avoid getting the
wrong colour knots. It is sometimes possible to fix this without undoing
all the knots by pulling the (light pink) thread tight, but it doesn’t
always work if you’ve already knotted rows after that, in which case
you will sadly have to undo all the knots until you get back to the problematic one!
2. If your row is getting wider with gaps
between the knots, this means you’ve not been tying the knots tightly
enough! You can’t fix this without unpicking, so try to always tie the
knots fairly tightly. I’ve had this problem LOTS of times!
3. If your bracelet looks like it’s curving off
to one side, don’t worry, you’re not doing anything wrong! It will look
like this until it gets longer, when it will straighten itself out.
Only the end, if anything, will be slightly curved, but only slightly
so.
Comments For
How To Make Friendship Bracelets (basic diagonal stripe)
Rating: FIVE STARS
Excellent Homeschool Activity
by: Sonya
Thank you so much Sandy!
We love making friendship
bracelets in our homeschool but it is quite complicated to explain how
to make one! Your pictures are really great and the bracelets are
lovely. You've really managed to show what you need to do - and I was
really pleased with the handy tips for when things don't go quite as
planned!
Thanks so much - I'm sure lots of homeschooling families
will really enjoy making this bracelet and it's surprising how lovely
such a simple pattern looks.
Love this page? Help me spread the word by sharing...
- Home
- Activities
- Friendship Bracelet
"Just had a look through your monthly
newsletter focusing on math. Thanks so much for all the links and
ideas. It's brilliant!" ~ Diana
"Hi....I totally love all your posts and enjoy reading them....the kids love the activities and enjoy them through and through." ~ Bianka

Free Newsletter

Must-have Handbook
4 books in one: Bargain discount deal!
"With the education system failing so many brilliant
children it's great to be able to have resources like your website for
inspiration, ideas and just a sense of belonging. What you are doing for
your children is priceless." ~ Natalija
"I really appreciate your time and effort that goes into your posts... It's nice to see that you are a 2nd generation homeschooler." ~ Teresa
"Your newsletters & book have helped us through our journey. For that I can only thank you.
Please, please, please keep it up, people like you make our home school life so much easier." ~ Kelly
"I have joined paid sites that were not even one percent as great as
this site. Really amazing what you are doing and so so helpful thanks so much!" ~ Eli
